Sanding proved to be a bit tricky, due to the small cut out details. I did the best I could on those parts but got a really good finish on the larger areas.
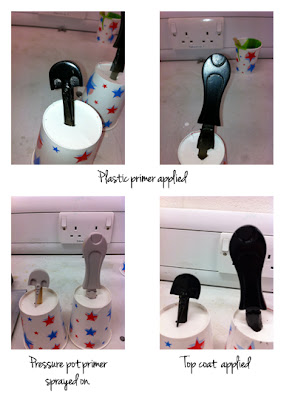
After sanding it's ready for spraying. I applied a plastic primer, waited an hour then added a pressure pot primer. By the time I'd done that, the workshop was closing so I took it home to rub down ready for the next coat. That didn't work well, the paint just peeled straight off. I must have got too good a finish on it, there was nothing for the primer to key onto. It looked a bit of a mess!
 |
| Ooops! |
This was a bit of a blessing in disguise though, as it allowed me to insert the circuit and join the two halves together. I was unable to do that in the workshops as I had left my circuit at home. I got quite a nice, neat seam and was also able to sand the lid while it was on to get a smooth overall shape. Before I fastened it all together I ensured that the USB plugged into the computer and that the shoe was facing upwards when it was inserted.
So I went back to the spray booth and applied the plastic primer - after making sure I'd provided enough of a key! Then on goes the pressure pot primer. I applied 4 coats of this, rubbing down and filling any gaps in-between coats. When I was happy with the finish, it was time for the top coat. I chose a glossy black paint as I wanted the shoe to look like patent leather.
 |
| Spraying process |
I wasn't happy with this so I started looking round for an alternative. I found some embossed card that I'd had for a while which looked promising. It's got a four leafed clover type design and the individual designs fitted within the insole which created a pleasing effect. It was hard to get the shape right as I had trouble importing the Creo drawing file into CorelDraw so I couldn't use that for a template. I followed all the steps but CorelDraw wasn't having any of it, it just kept crashing. I ended up using tracing paper to create the template then transferred that to the card. I attached it with glue and think the overall effect is very nice.
 |
| Finished insole |
However, disaster struck. When I peeled off the masking tape, one side came away perfectly and left a lovely clean line. The other side didn't, it took quite a lot of paint off. I was devastated. I'd worked so hard to get a good finish and it was ruined in seconds. I can't understand why it did it - I used the same piece of masking tape (ripped in half) on both sides and the paint had had plenty of time to dry. I couldn't get into uni to rub it down and respray as I had to take my dad to the hospital ready for his operation. That was extremely frustrating and my dad felt so guilty. In the end I had to colour it in with black permanent marker. From a distance it looked OK but up close it was a big ol' mess.
All that was left was to add the diamanté detail to the heel. Yet another fiddly job! They're only 2mm wide so very tricky to apply glue and put into the holes. I think they finish it off well.


